Saturday 31 March 2012

The Devil Made Me Do It!

Coda di Rospo in Padella con Patate Dolci e Finocchio
Pan-Seared Monkfish with Sweet Potato and Fennel


I know you can hardly believe your eyes... but yes- that is a beautiful piece of fish you see there. And although I am not the greatest of fish-lovers, by any stretch of the imagination... I was indeed tempted by this lovely, succulent monkfish today... I just couldn't resist!

Without doubt, monkfish is one of the ugliest fishes in the sea... black, with a huge, broad mouth full of razor-sharp, pointed teeth... it is no wonder the Germans call it "Seeteufel", or "sea devil".  But the flavor is as heavenly as it's appearance is hellish! Under the black skin, is a layer of gray "slime"- it really does look a bit nasty until the fishmonger has prepared it. The wonderful thing about monkfish is that has no bones, just one thick spine of cartilage which makes it easy for the fishmonger to fillet for you.
The fact that it is usually more expensive than sushi-quality tuna should indicate just how wonderful a fish this is to eat though... and if I even like it then it has to be good!


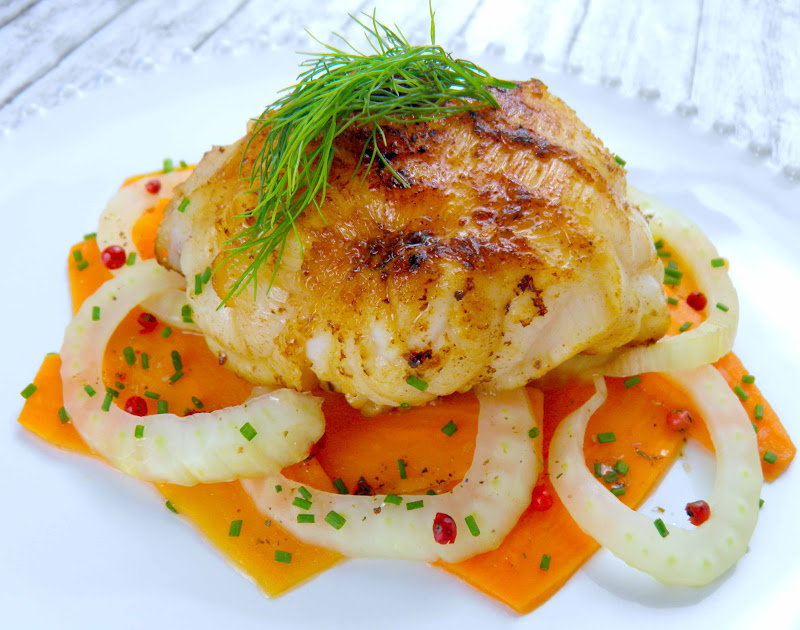
I served my fish on a bed of steamed sweet potato and fennel, which I began preparing as the first thing of all. I peeled and sliced the sweet potato very thinly, lengthways and cut the fennel to a similar thickness. I laid them out in my steamer, with slices of fresh ginger in between and let them cook for 10-15 minutes.  


I marinated the fish in lime juice, garlic and a little olive oil for around 10 minutes before frying, just to give it a head start in the flavor department. Next, I cranked up the heat and added the monkfish, a couple of slices of ginger and garlic and a 2" piece of

 vanilla, face-side down and fried it for 3-4 minutes. I trickled a little of the marinade onto it and then flipped the fish over and gave it a further 3-4 minutes, before turning off the heat completely and putting on the lid. Allow the fish a further 5 minutes in this way, in order for the residual heat to gently cook the fish through, without overcooking it or drying it out.

I sprinkled the finished dish, with finely chopped chives, a few red pepper corns, a little salt and pepper, some lime juice and a few drops of good olive oil. And it really doesn't come much easier or more delicious than that! Buon Apetito!

Friday 30 March 2012

Inside Story

Budino di Riso & Cocco al Forno con il Centro di Crema alla Vaniglia & Pistacchio
Baked Coconut & Cinnamon Rice Pudding with Vanilla Custard Center & Pistachio


Yes, this is indeed an inside story- because anyone can simply pour custard over their dessert, but how often do you have it on the inside? That's right- unless you are having a custard pie, not very often at all!


And that was my dilemma this evening- craving something sweet and not being able to decide if it should be a nice, simple rice pudding or a small custard pie, I decided to treat myself to the best of both worlds... and made it into something rather special at that!


I prepared the rice pudding using a mix of 1/4 coconut and 3/4 rice, which I boiled in skimmed milk, together with cinnamon, a hint of nutmeg and liquid Stevia to sweeten it- 1 teaspoon was plenty for my taste. A tiny squeeze of lemon juice and a pinch of salt rounded off the flavors nicely. I really didn't want it to be overly sweet as there was still the custard to come! The rice took around 20 minutes to cook- which left me plenty of time to pre-heat the oven and to prepare my custard!


I made the custard by whisking together 1 egg yolk with 2 tablespoons of milk, 1 teaspoon of Stevia and 1 heaped tablespoon of corn flour. I brought about a coffee cupful of milk up to the boil, together with a 1" piece of vanilla and a hint of cardamom. I let it simmer gently for 5-6 minutes and then removed it from the stove and poured it through a fine sieve. I stirred a little of it into the egg-yolk / flour mix, mixing it in well and then added more liquid little by little, stirring constantly. In this way you can avoid any lumps happening. Once you have added enough milk that the whole mix is nicely runny, pour it back into the milk and return it to the stove and bring it gently back up to the boil, stirring continuously until it thickens down to a nice consistency.


I spooned the finished rice-pudding into my oven-proof bowl and made a hollow in the center, into which I poured the rapidly thickening and piping hot custard... and off it went, into ma hot oven to be turned into something wonderful! I baked it at 400° for around 10 minutes and then added a light drizzle of honey to the rice pudding, just to give it a nicer color and a lightly caramelized flavor. After 5 more minutes it was golden brown and ready to be served! A sprinkle of pistachio splinters gave a nice, contrasting texture and flavor and was the finishing touch to this wonderful little dessert with a heart of gold... I hope you like it as much as I did!


Putting the "Tart" into the Tarts

Crostate di Limone & Feta con Crescione e Miele
Lemon & Lime Feta Cheese Tarts with Honey and Cress


These tasty little pastries are savory and tangy at the same time- a lovely combination for a sunny day! Such a pity that it was everything sunny here in Frankfurt today- but I made them all the same as a little consolation... and it was like the sun came out after all... for a few minutes at least!


Using my trusty weapon of pre-made puff-pastry, there were whipped up in no time and very easy to make. They would be great for picnics or parties, as appetizers or simply as a light and tasty lunchtime snack... and this is all that you need to do to make them!


First of all, turn you oven on to the highest setting and start it warming... puff-pastry loves high temperatures to get it nice and fluffy.


Next, slice off the tops of your lemons and limes, and then proceed to slice off little slivers of fruit with peel. In a saucepan, melt a couple of tablespoons of sugar with a couple of tablespoons of water, add a pinch of salt and then add the lemon and lime and let it cook for 3-4 minutes in the sugar syrup with a couple of sprigs of rosemary and thyme.

Cut the pastry into squares and then cut strips that are slightly shorter than the width of the base- then lay these on top to form a little "frame"... you do not need to stick them in any way- just lie the 4 strips in position and the oven will take care of the rest for you! You will find that already after 5 minutes, these pastry bases will have risen to incredible heights! Do not panic! lol! I know there are methods of placing baking paper and some kind of weight, i.e. stones or beans on top of areas of pastry that you want to "bake blind", so that they do not bake too quickly or indeed rise up in this manner... but life is too short to go to all of that trouble- simply take the tray out of the oven and pat the pastries down flat in the middle with a spoon!

Spoon on a little of the citrus mix and sprinkle with finely diced feta cheese- then continue baking until the pastry becomes golden brown. Once the pastries have cooled, sprinkle with a few chili flakes, scatter lightly with watercress and add a few drizzles of olive oil before serving. Here comes the Summer!


Thursday 29 March 2012

Wrinkles and All!

Mafaldine con Sugo di Carne, Peperoni e Pomodorini
Mafaldini with a Ground Meat, Pepper and Cherry Tomato Sauce


Yes indeed, I love this kind of pasta- not despite it's wrinkles- but much rather because of them! This is a great pasta to make with sauce- the riffled edge makes it adhere better than to spaghetti for example and the flat surface takes up more volume of sauce- and what's not to love about that?

The way it feels on your tongue is wonderful though and that is my favorite thing about mafaldine- they tickle and tease and are just plain fun to eat! And with a tangy and fruity sauce like this to go with them, they go to make a real treat of a supper!


Let's begin with a little sofritto to make our sauce. For those of you who are not familiar with it, "sofritto" is the starting point of many Italian sauces and it consists of a fine dice of onion, carrot and celery, which are gently fried in a little olive oil (hence the name- fritto means fried), in a large frying pan. This serves as a great savory flavor base that can be added to. In this case I added ground beef and pork, very finely diced red pepper, basil, oregano, parsley and ramps as they are in season- otherwise I would have used a little crushed garlic. Salt, pepper and nutmeg to season, Tabasco to give a bit of a kick and we are getting closer...

Next, add a tablespoon or so ot tomato paste and allow this to fry for a minute or two- this makes the flavor fuller and milder. At this point, things will probably begin sticking to the bottom- but that is ok- those are just good flavors cooking down that are waiting to be unleashed on your eager taste buds. This time, for a change, I did that by deglazing the frying pan with a small glass of orange juice- which will create a cloud of steam and a wonderful aroma!

Let the sauce reduce and render down for a further 10 minutes- time enough to prepare the pasta. Boil the pasta as according to the instructions on the packet- 8-9 minutes is usually the average time so that should work out perfectly. Once the pasta is cooked, drain it, top it with the delicious sauce and serve with some fine, fresh shavings of parmesan and a sprinkle of cracked pepper corns... and Enjoy!


Wednesday 28 March 2012

Whipped into Shape!

Crema di Formaggio e Cioccolata con i Cumquat Caramellate
Chocolate Cream Cheese with Caramelized Cumquats


Time for a little dessert. How much time- between 5 and 10 minutes? How does that sound? Yes, I thought you would like that! But you know that my desserts are always going to be ultra easy and faster than a speeding bullet to make now, don't you? And of course this one is no exception!

As you know, I am a great fan of cheese curd, which is easily and readily available over here in German- low fat and inexpensive and just plain yummy... if you know how! Of course you can substitute it for whichever cream cheese you prefer or is available to you- the only thing you need to do is whisk it into something yummy- and I will tell you how!


First things first- we need to sweeten those cumquat's a little! being on my Stevia trip- I used some of that- but of course you can stick with sugar... what we need to do is to either dissolve a couple of teaspoons of sugar into a glass of water or you can use Stevia to taste- just to bring t to the boil with a stick of cinnamon and a star anise and have a nice, sweet light syrup. Boil the cumquat's in it for 5 minutes, along with a star anise and a stick of cinnamon until the sweetened water boils down to a syrup and they begin to soften- then transfer them to a frying pan with a teaspoon of brown sugar and crank up the heat a little so that they begin to caramelize.

Whilst that is going on, whip 2 tablespoons of cheese curd with 1 tablespoon of yogurt per person. Add a full tablespoon of bitter cocoa powder and sweeten either with Stevia, again, or with sugar. If you are going to use sugar, use a confectioners powdered sugar as it will dissolve much more easily. Whip for a full 5 minutes. If you are making this for adults- feel free to add a good shot of Cointreau- as I did... otherwise it will be just fine as it is!


And basically that is all! I added the hot cumquat's in their sticky glaze to the chilled, chocolate cream cheese and decorated it with a little fresh mint. Yes it is simple and yes it is tasty. Made with Stevia and low-fat cheese curd, apart from a teaspoon of sugar to caramelize the cumquat's, it is also even rather healthy! Good heavens... how wonderful is that???


Enter the Steam Age!

Polpettini con Spezie Cinese, Cimi di Rapa & Salsa di Arancia e Zenzero
Steamed 5-Spice Meatballs & Broccoli Rabe with Ginger & Orange Sauce


Steamed food, for some reason, still has the connotation in many peoples minds, of being bland and tasting "washed-out"- whereas the truth is very much the opposite case. Quick, easy and healthy as well, steaming is a great way to produce a meal- especially as you can steam many items together at the same time- it is something we should all do more often!

The great thing here is that I managed to steam all of the ingredients at the same time and only needed one other tiny saucepan to put together the tangy orange sauce- which absolutely suits me to a "t". I like to keep my stress to a minimum and to get things done quickly and easily... and you can hardly get quicker or easier than this!


I made the meatballs out of a mix of 50/50 ground pork and beef- which I amazingly saw minced right before my very eyes! I mixed this together with finely chopped red pepper, Spring onion, parsley, mint, basil, ramps and a tablespoon of 5-spice powder and rolled it into little balls, making sure to not press them too firmly together. I did not add any egg or breadcrumbs as I wanted to keep the flavors nice and crisp and intense.

I placed the meatballs and the broccoli rabe in my steamer, and had some Jasmine rice in the saucepan below... so by the time the rice was cooked, 15-20 minutes, so was everything else! Before I started, I added some thinly sliced ginger and red peppers- then on went the lid and I turned my attention to roasting some sesame seeds for my garnish and making the orange sauce...

The sesame seeds too all of 5 minutes to toast to a nice golden brown in a dry frying pan- and in the meantime I scraped some orange zest and squeezed some juice ready to make the sauce. I grated a shallot and a little garlic on the finest grater I have and sauteed this in a little sesame oil until it began to brown gently- then deglazed it with the orange juice and added the zest. I seasoned it with soy sauce, green Tabasco, lime juice and a little honey and reduced it down by simmering it for the duration until the rice and meatballs were done. A simple and tasty meal- stress free and relatively healthy considering no added fat or frying. And that can only be a good thing!


Tuesday 27 March 2012

Give it up for Lentils

Insalata di Lenticchie Rosse e Topinambur con Crema di Formaggio in Nidi di Bresaola
Red Lentil + Sun Choke Salad with Cream Cheese in Bresaola Nests


Lentils- delicious, healthy and filling, make for many a wonderful meal at any time and are easy and versatile to use- especially the red ones. Here is another suggestion for a light but satisfying Springtime meal- done in around 25 minutes and pretty as a picture to boot!


The little Bresaola nests were more of an afterthought to be honest- but at the same time are an excellent way to make use of leftover ham or bacon... which can happen to the best of us! Of course you can easily skip these crunchy delights if you are of a vegetarian persuasion- but I must say that they certainly did the trick for me and made this light dish into a full meal... and were a wonderful added extra!


The first thing I did was to turn on my oven and pre-heat it to the top temperature. I took a muffin tray and turned it upside down, then squeezed 3 slices of bresaola down onto each of the cups to form the nest shapes. Into the oven they went for around 10 minutes. After 10 minutes, they were firm enough to remove but rather moist and soggy on the inside, so I turned the tray back over and now set the bresaola back inside the muffin cups and baked for a further 10 or 15 minutes until firm, crispy and dry.


For the lentil salad, I peeled and finely diced the sun choke and boiled it together with the lentils in salted water for 5-6 minutes. After this time, I drained off most of the excess water and stirred in 1 tablespoon of tomato paste, added the juice of half a lime, 1 finely chopped Spring onion, a little Tabasco, some coriander and some cinnamon powder. I added a little sesame oil, mixed everything together and then allowed it to rest with the lid on top for a further 10 minutes or so. This way the lentils did not overcook- which otherwise happens all too easily!


The cream cheese, was a simple affair- either fresh, creamy ricotta cheese or low-fat cheese curd will do the trick. I used 2 tablespoons of cheese to 1 teaspoon of pesto, mixed it together thoroughly and hey presto! A wonderful complimentary flavor to both the lentils and the bresaola! The finishing touch here was a little balsamic glaze and for the lentil salad, a nice handful of water cress which I stirred in with a little more sesame oil and a hint more lime juice. Easy, delicious and fun! Hope you enjoy it!


Monday 26 March 2012

What shall we Eat with the Drunken Sailor?

Farfalle con Gamberetti, Aneto, Ricotta, Semi di Girasole Tostate e Sambuca
Farfalle with Shrimp, Dill, Ricotta, Toasted Sunflower Seeds and Sambuca


Well, shiver me timbers! That there be a fine plate of food- even if I do say so myself! And with a full shot of Sambuca, per person, it packs a tasty punch too! It is Springtime at last and time for some fresh flavors and lighter dishes. But they needn't be lightweights in the taste department!

The aniseed flavor of the Sambuca and the fresh dill make for a great combination with the shrimp, lime, garlic and ricotta cheese... and doesn't that just make you think of a  Mediterranean Summer in the nicest possible way?


As you can see, this is a very simple dish, which takes all of 10 minutes to make- just the time it takes to boil the pasta and then to assemble everything on your plate... and that's my kind of meal on a weekday night!


So- let's get busy and let's start by boiling that pasta according to the instructions on the packet- usually 8 minutes. In the meantime, crush and chop and squeeze into a past a clove of garlic- you know how, by sprinkling it with salt and using the flat edge of your knife. I am sure you have seen that done. The coarse structure of the salt crystals grinds the garlic down and it soaks up the juices as you go. We want to use half of the garlic paste to season our ricotta and the other half for the shrimp. So lets start with the ricotta...

Stir the garlic paste, some white pepper, lime juice and a little more salt if necessary into either fresh ricotta or cheese curd and whip together until nice and smooth. There- that was easy, wasn't it?


Another ingredient is toasted sunflower seeds, which I thought would give a nice "bite" and a pleasantly nutty flavor. Also... it made me think of the acres and acres of sunflowers we have "back home" in Sicily... sigh!


Next, the shrimp, which are simply fried at a moderate heat in olive oil, with a little Tabasco for flavoring and the garlic paste we prepared just a few minutes ago. Once this begins to stick to the bottom of your frying pan- and it will, deglaze the pan with a good shot of Sambuca- maybe two- haha! Yes, you can actually quite literally do that as long as you let it reduce down a little- which it does very swiftly. Add only a little salt... the fun thing here is, that the sugar content of the Sambuca will actually caramelize a little and become a wonderful sweet-ish glaze on the shrimp which tastes pretty amazing! 


By now the pasta will be good, so drain it , transfer the shrimp into a small dish for the interim, and stir the pasta through the frying pan to pick up all of the good flavor. Feel free to add a little more olive oil to the pasta if necessary, but I found that swirling it around the frying pan was more than adequate. At this point, I added a finely chopped Spring onion- the heat of the pasta will cook it just enough to take the harshness out of it and make it somewhat milder, though still savory and fresh.


Spoon the pasta into your serving plate and distribute the shrimps and creamy, tangy cheese evenly, along with plenty of fresh dill. Sprinkle generously with chili flakes- of if you have them, as I did with flakes of smoked paprika. Squeeze a few drops of lime onto it and serve with a nice glass of Corvo Bianco... and imagine you are enjoying your meal under the Sicilian sun... or on a pirate ship!


Sunday 25 March 2012

Bombay Underground

Patate Dolce e Topinambur con Spezie Indiani
Indian-Spiced Sweet Potato and Sun Chokes


Things have been a little meatless in my kitchen of late- but you know, there are so many fun alternatives that it doesn't have to be a question of being vegetarian or not- it is just that life is too short to not enjoy a little variety! And with the multitude of spices that we have to flavor our food- there really is no reason at all for it to be bland or boring...

So this is a dish of spiced-up sweet potatoes and sun chokes. I wanted to see how much flavor I could infuse them with, using a few Indian spices- and was rather pleased with the result I must say!


I started out by steaming the sweet potatoes and chokes together for 10 minutes. Remember to sprinkle the sun chokes with lemon juice as soon as you have peeled them, as they tend to discolor very quickly!

Whilst they are cooking, dry-roast the spices in a dry frying pan. I used fennel and caraway seed, a little finely chopped ginger, a small star anise and the seeds from a couple of cardamom pods. After around 4-5 minutes of pan roasting, I ground them up finely with my mortar and pestle.

After the sweet potato and chokes were done, I transferred them to the frying pan with a teaspoon of clarified butter and the spices, as well as a tablespoon of garam masala and a tablespoon of tandoori spice. And of course salt and pepper as usual! I fried them at a moderate heat for 5 minutes, stirring gently and making sure that everything was coated well. I then added a squeeze of lime juice, a little honey and some chili flakes. Simple! But tasty!

I served them with some simple steamed Basmati rice and a sauce made of yogurt, mint, Spring onion, garlic, cucumber, lime juice and a little green Tabasco.

And of course this is not traditional or authentic Indian cooking in any way- but it is all kind of delicious in every which way! And that is a fact!

Big Red Salad

Insalata di Radice Rosso, Carote e Cetriolo, con Miele, Yogurt e Senape
Radish, Carrot and Cucumber Salad with Honey, Yogurt & Mustard Dressing


Now, you are asking yourself where the "red" in the salad is hiding, right? Big red nothing is what you are thinking- but the name refers to the kind of radish I used to make this. The variety I used goes by a number or names- "Red Scarlet" is one and "Neckarruhn" it the other I have been able to find for you online. But the fact is, that this radish looks exactly like a carrot- only of course in red... and rather different to those little salad radishes we all know and love.

The flavor is much milder- it has the typical taste of radish without that earthy and peppery aspect that they tend to have. In any case- it made for a wonderfully refreshing salad this afternoon- and I put it together like this...


I cut the radish and cucumber into very thin slices and shaved a small carrot into strips using a vegetable peeler. I then sliced a Spring onion very thinly and plucked some dill to add a little green and to compliment the cucumber. I put all of these ingredients into a small bowl and marinated them briefly in lime juice, sugar, salt and a little olive oil. After 5-6 minutes, I carefully took them and arranged them on my serving plate as you can see below.


Of course I made a tasty dressing to go with the salad and it  was a very simple affair too. I used the leftover lime juice that I had marinated the other ingredients in and added a tablespoon of Dijon mustard to it, stirred it well and added 2 tablespoons of plain yogurt. I seasoned it with salt and pepper, added a little more olive oil and that was it... pretty easy, huh?

I didn't add honey to the dressing, but rather, trickled some pure honey onto the salad before serving- it makes for a nicer flavor and is more pleasing when you taste each separate flavor when eating. And the combination of all of these flavors was a treat indeed- one that I hope you might enjoy too!


Rhubarb! Rhubarb! Rhubarb!

Clafoutis di Rabarbaro, Fragola e Mirtillo
Rhubarb, Strawberry and Blueberry Clafoutis


Rhubarb- pink, tangy and very, very yummy- and best of all- very much in season right now! To be honest, this was my first time cooking with rhubarb- but I think it won't be the last- especially if I stick to this method... it is so simple and works like a dream!

A lot of people have a problem with rhubarb, but I am guessing, as with most things edible, that the reason they don't like it is because they have only ever had it cooked to death and mashed to a sticky pulp. Well- you probably wouldn't be very nice if somebody did that to you now, would you? ;-)


So- what's the big secret? It's simple- you just need to decide when to make your rhubarb compote the night before... so you get a whole night's sleep into the deal and it is sitting there waiting for you, delicious as can be in the morning...

First things first- get your oven switched on at the highest setting and pre-heat it so you will be ready for action in just a few minutes... because it only takes a few minutes to prepare this!

Simply peel away the skin and the sinews from the rhubarb and rinse briefly, then cut it into bite-sized chunks and put it into and oven-proof dish. Add some berries- I chose to use strawberries this time, but raspberries would also work wonderfully. I added the blueberries too for extra contrast... but as I say- you can use whatever kind of berry you like. Sprinkle with cinnamon and either sugar, if you have no problem with that, or Stevia as I did- I simply wanted to try to make this sugar and fat free and see if it works... and of course it did! But if you want to use sugar- not a problem!


If you are making this for adults only, a shot of Cointreau goes with this very nicely- if not, simply add a little water- half a cupful will do. Stir everything well and place into your hot oven for 20 minutes. After those 20 minutes are over, turn off the oven, turn off the light and go to bed. Seriously! Turn off the heat and let the rhubarb and berries continue to do their thing until they cool down. What happens is, that the natural pectin in the rhubarb, binds all of the delicious juices that it and the berries give off during cooking and what you are left with in the morning is a thick, rich berry and rhubarb sauce. The best thing of all is that you have not had any work at all, have not stirred everything up in a saucepan and caused it to become mashed and ugly- and that you are ready to go with making the clafoutis! This is a good start to the morning- don't you think?

I even cheated a little making the clafoutis of course- and why ever not? For a clafoutis like this one in the image, which serves two, you will need only one egg- isn't that amazing and cool? I love the fact that it is possible to indulge like this and be sensible and healthy at the same time. This is how I made it. I separated the egg and beat the egg whites up till they were nice and fluffy (don't forget that pinch of salt!) and beat the egg yolk with 1 tablespoon of custard powder, 1 teaspoon of baking powder and 2 tablespoons of cheese curd or yogurt. I added vanilla and cinnamon and again sweetened with Stevia- otherwise feel free to use sugar. I gently folded the fluffy egg white into the yolk mixture and poured it straight into my oven dish. I added half of the rhubarb and berries, spreading them out a little and dropping them into the fluffy egg mix carefully, so that they do not simply fall straight to the bottom of the dish and disappear!

Bake at 400° for 20 minutes, then take it out, add more berries and rhubarb on top and bake for a further 5-6 minutes- and prepare to have a wonderful breakfast! You're going to love it!


Saturday 24 March 2012

Growing Out for Dinner

Fiori di Zucca ripieni di Ricotta con le Erbe
Zucchini Blossoms stuffed with Herb Ricotta


I love trying new things and despair at the thought of how so many of us eat the same things day in and day out. There are so many things out there that we CAN eat- and we are indeed privileged to live in a society where we do have options. So many things get overlooked, or seem too difficult or complicated to prepare, or appear to be expensive, that most people pass them by.


But to be brutally honest, many people are eating too much, too unhealthy and simply too unthinkingly. Take these delicate little zucchini blossoms. You may say, what is the point? Or that they are more trouble than they are worth, or that you could by a couple of bags of potato chips and a dipping sauce for the same price and have that as an appetizer... but then you would be missing out!


I prepared a stuffing for these out of low fat cream cheese- actually, again, being in Germany,  chose to use cheese curd, which is readily available and very popular over here. But you could certainly used a fresh, creamy ricotta or any other cream cheese that you prefer.


Herbs and a Spring onion were the other other ingredients- all as finely chopped as possible. I made a mix of parsley, mint, ramps, and a little rosemary. I added these to the cheese curd along with a squeeze of lemon juice, the grated zest of half a lemon and a hint of cayenne pepper. I seasoned with salt, regular pepper and nutmeg and stirred well together. To add a little texture and bite, I also added some toasted sunflower seeds, and about enough breadcrumbs to turn everything into a nice compact mass. And basically

that was the filling already prepared and ready to go!


The blossoms themselves need to be carefully opened, and the stamen inside needs to be removed- it snaps out very easily. Now scoop a teaspoonful of the mixture out of the bowl and into the zucchini blossom. Just ease it into place and squeeze the ends of the blossoms together- they will stick easily together and stay in shame with no problems at all.


Drizzle very lightly with olive oil, make sure they are coated evenly all-round and place into a very hot oven for 5 minutes, then remove, flip over carefully and finish off for a final 5 minutes, until golden and brown... It really is all as simple as that!


Super Lightweight

Insalata di Bresaola, Finocchio, Cetriolo e Mirtilli
Bresaola, Fennel, Cucumber and Blueberry Salad


This tasty and delicious appetizer would be a great way to begin many a wonderful meal.

I found the combination of flavors to be refreshing and light and perfect for a Spring or Summer menu- the combination of fruit, vegetables and the paper-thin cured beef was just plain yummy!


What makes it so nice is indeed the thinness of the slices- and that is the only difficulty involved in this- meaning it is not difficult to make at all!


So- the only thing that needs to be prepared here is a little seasoned salt, which I will quickly describe again for those of you not yet familiar with the way I make it. You can use any number of combinations of ingredients, but today, I used coarse sea salt together with lemon zest, basil, chili, lavender, Sichuan pepper and a little rosemary. I also added maybe a 3rd of the amount of sugar as I had salt in the mix. I ground it all together with a mortar and pestle, until the herbs and spices and the zest had infused their flavors into the salt... and this was to be my seasoning for the salad.


I sliced all of the ingredients as thinly as I could- the bresaola is always sliced paper thin and arranged them decoratively on my plate. I sprinkled everything lightly with the flavored salt and then added a few blueberries and a little delicate paper-thin shaved salted ricotta. I added a few of the fennel greens and a tender celery leaf as a garnish - the dressing was a simple, good olive oil and a light squeeze of lemon juice... and that was it! All of the other flavors are in that wonderful salt- so enjoy!


The Height of Good Taste

Fragola & Kiwi in Fette, con Yogurt alla Menta e Mirtilli
Strawberry and Kiwi, with Blueberries and Minted Yogurt


Oh my, we are beginning to get fresh strawberries here! Lovely, big, juicy and wonderful ones- at least the ones I got today were! They were almost a big as kiwi fruit! I was just planning on chopping up some mixed fruit and adding it to my yogurt as usual- but then I decided to get a little playful and have a little fun at the same time...


One other thing that I love in combination with fruit is fresh mint. It always compliments and intensifies the fruits natural flavors... so of course, the combination of fruit, mint and yogurt could only be a good thing. And how!


This is not even remotely close to being anything that could be described as a recipe- but it makes for a jolly-delicious and healthy dessert! The only thing that needed any preparation was the yogurt- and that was simply flavored with mint syrup, straight from the bottle. There- I have admitted it! And of course you can also use fresh mint, as I often do for savory dishes, I just find the smoother consistency more pleasing in a sweet dish. I added a hint of Stevia to make the yogurt sweet enough to be used as a sauce- but you don't really need to add that much as the syrup itself is already sweetened.


I cut the strawberry and kiwi in slices and reassembled them in alternating layers. I didn't sweeten mine at all, but you could always sprinkle the fruit slices lightly with sugar and let them marinate for a little while- but the sugar will draw out the natural juices of the fruits and it will look a little "slimier" that way... and obviously, I wanted to have a pretty picture to show you!


I added a few blueberries for a bit of variety and dressed all with a light drizzle of the sweetened, minty yogurt... and the combination was delicious! And SO simple!


Friday 23 March 2012

Skinny Dippers!

Trizzi di Pizza con Guacamole alla Siciliana
Plaited Pizza-Twists with "Sicilian Guacamole"


Life can be so complicated- but at least supper can be a simple affair! I may be being a little silly and flippant now, but on the other hand, if the only thing I can change in this world is a few people's suppers- then so be it! Let's have some fun!

These tasty snacks were made up from leftover pizza dough- the store-bought stuff that I used 2 nights back. So you see- there is always something different and fun that you can make out of those little bits and pieces. Let me tell you how :-)


This is so simple and so much fun. Cut the dough into rectangles of roughly 3" x 6" and then about 1/2" from the top edge, cut the rectangles into 3 equal strips. Spread the left and right-hand strips out a little and then apply the 3 flavors. On the left hand side, I used a red pesto, made with sun-dried tomato, chili, red peppers, onion and garlic. I blended these ingredients together with a little olive oil into a smooth paste and seasoned it with a little salt and sugar to taste. The middle strip was simply covered in sesame seeds. The right-hand strip with a traditional pesto alla Genovese, made of basil, pine nuts, garlic and olive oil.

To plait the pizza twists, fold one of the outer strips over the sesame coated middle strip and then the adjacent one in turn back the other way- then pinch all three strips together slightly at the top and bottom to hold them in shape and off into the oven they go for 10 minutes at the highest setting. Remember- those ovens at the pizzeria are much hotter than your oven at home- so fear not!


After 10 minutes, fetch them out of the oven, brush them very lightly with olive oil and give them a little sprinkle of salt. Back in they go for 2-3 minutes and then they are ready to enjoy- either hot or cold!

I made a variation on the theme of a traditional guacamole to dip them in out of the following ingredients: 1 ripe avocado, coarsely crushed with a fork, the juice of 1 lime, I finely chopped Spring onion, 2-3 chopped olives, 1 chopped sun-dried tomato, 1 handful of mint, basil, parsley and coriander, salt, pepper, nutmeg and green Tabasco. Mix all of these ingredients together well and let the flavors infuse together for at least 30 minutes... by which time those pizza snacks will be cool and ready for dipping!

So simple! So simply enjoy!