Friday, 30 September 2011

It's in the Papers

Salmone Aromatico Avvolto in Pasta di Riso con Barbabietole, Zucchine e Piselli 
Aromatic Salmon wrapped in Rice Paper with Beetroot, Zucchini and Snow Peas


Time to try my hand at doing something a little different and exciting with fish... you guessed it- it's Friday night in Frankfurt! The weather is surprisingly mild- sunny and warm and demanding something fresh and light for supper. And as usual, I have a few leftover bits and pieces I want to use up... So here we go- quick, colorful and very, very tasty- what a good way to start the weekend! 

I wanted to give the fish a nice blast of flavor- I had ginger, cilantro, garlic and spring onion in mind, but wasn't sure of how to go about it. The fish I was using was salmon, so another aspect that had me concerned, was the fact that it quickly gets overcooked and becomes flaky and dry. And then I had a sudden flash of inspiration!


Next I finely chopped the garlic, spring onions, cilantro and a little parsley, added a little chili, sea salt and pepper- and had a lovely aromatic topping for the fish. next step was to briefly soak the rice paper sheets in water ready to use. I then took the salmon and drizzled a little honey on to it and then sprinkled it generously with the chopped ingredients, which of course stuck nicely to the honey. I then ley the fish, face-down onto the center of the rice-paper and folded it into a parcel. I did find that the sheets were a little too large for the size of the fish I wanted to wrap- so I trimmed it down with a pair of kitchen scissors... easy.


The fish-parcels went into a moderately hot frying pan with a little clarified butter from the reverse side first (the one with no herb coating), where I let them fry for 2-3 minutes until the rice paper became firm and started to brown slightly. I then flipped them over and gave them a further 2 minutes at a higher temperature to give them a little color, As soon as they were done, I popped them into the oven to keep them warm, whilst I quickly sautéed the vegetables and got ready to serve!


The beet root was the final leftover from 2 nights ago- and so that was pre-cooked and just needed slicing and warming through. The zucchini I sliced and sautéed with a little garlic, until it was lightly brown. And the snow peas were simply tossed in a little butter and sugar to give them a nice glaze.

The combination of flavors was crisp, clean and light- a squeeze of lemon and a drop of sweet chili sauce and dinner is served- lightly exotic and very delicious! Enjoy!

Thursday, 29 September 2011

Pulp Figtion

Pizza con Fichi, Pancetta, Olive, Cipollini, Basilico e Parmigiano
Grill-Pan Pizza with Fig, Bacon, Olive, Spring Onion, Basil and Parmesan Cheese


Yes, I am sure you are all familiar with my frying pan pizza's by now and other than listing the ingredients for the topping, I know there isn't that much more to say about them... So maybe for a change I won't. I will keep it brief and I will let the pictures do the talking for me.


The only "trick" to making this delicious little snack, is that you need to fry the bacon in a dry pan for a while before putting it onto the pizza- just get it cooked but not browned off- the broiler will do that for you in no time. The trick is, once the bacon has been removed, drop the basil into the  pan and give it a good stir to soak up the juices and fat from the bacon.


If you didn't do this, the leaves would dry up and burn in the oven, but this way, they will turn dark, sure, but they will crisp up wonderfully and also be seasoned and delicious from the bacon juices. You could of course also dip them in olive oil- but I prefer the flavor of the bacon. That's about all you need to know... everything else is plain to see in the photos...


So I hope you have enjoyed them... and are on your way out to get some fresh figs before they are completely out of season!


Wednesday, 28 September 2011

Gift Wrapped Goodies

Pollo al Curry & Riso alla Curcurma Avvolto in Spinaci con Centro di Barbabietola
Curried Chicken with Spinach-Wrapped Turmeric Rice with a Beet Root Center


It's fun turning something simple into something special and half the fun is in the serving and presentation sometimes. Well this evening, I figured that if we can go to the bother of forming our rice in a small bowl and turning it out onto our plate, to make it look neater and elegant, we can go one little step further. And that is all I have done here... gone one little step further- and if you keep on reading you will find out how...


The rice is the first thing that needs to boil, as it needs to cool down before we can start shaping it- so I boiled Basmati rice with a teaspoon of Turmeric to give it a nice mild Indian flavor and a wonderfully vibrant color. You know by now how to boil rice I hope! And the Spinach leaves were simply blanched briefly in salted water, then rinsed-off under a cold tap to stop the cooking process and maintain the vibrant color. Easy so far, isn't it? I told you it was simple and now that we have our prep-work done we can start having some fun with this.


Whilst the spinach and rice are cooling off, we can start on our curry. I cut the chicken into bite sized chunks and fried it until it started to brown in a little clarified butter, then removed it from the pan. I then added grated ginger, finely chopped garlic, ground cumin, coriander, cardamom and Madras curry powder and stir-fried them for a minute or so until the flavors and aromas begin to develop. Now add a half of a banana that you have crushed down to a paste with a fork and a cup of milk. Stir well, return the chicken to the sauce and reduce to a low simmer until you have prepared the rice and are ready to serve.


Ok, the easy part is the beetroot, which was left over from yesterday! All I need to do with that was cut it into a neat cube of around an inch in size. For the rice, I took a sheet of Ceran wrap and laid out the blanched spinach on it nice and evenly. I then set this carefully into a ladle, but a small tea cup would also do. I then filled in a little of the turmeric rice, then set the beet root on top, then pressed down firmly and then filled around the edges and on top with more rice. Next thing I did was to fold the edges of the Ceran wrap over the top of the ball of rice and twisted it together, until a nice, tight ball of rice was formed. I then wrapped this in turn in Aluminum foil and set it into boiling water to bring everything back up to temperature. A lot easier than it looks, eh?

You can serve the ball of rice as a whole, or slice it through the middle as I did- it all depends on how much you want to surprise your guests I suppose! But what will also come as a surprise is how wonderfully these flavors combine together! I hope you enjoy them as much as I did!

Tuesday, 27 September 2011

Pretty in Pink

Linguine con Barbabietola, Zenzero, Finocchio e Limone
Linguini with Beetroot, Ginger, Fennel and Lemon


This eye-catching little dish of noodles has a nice story to it... 
Since I have been writing this blog, I have a number of people that follow it and also that write to me on Facebook... which is very flattering and much appreciated. This morning, one such person mentioned how their mother, who is not a computer person at all, always enjoys being shown my recipes as they are so nice and colorful- so sweet! Also, the color pink was mentioned on a number of occasions... sooo... I decided to make a dish especially in pink and especially for that certain lady... yes- you know who you are!


I decided to use beetroot, as it is a great seasonal ingredient to use in the Fall and has a wonderful natural coloring... which brings me to my first and the most important point about making this dish- if you decide to do so- wear something pink! Or at least red! One false move and you will be covered in that juice!
 

So- all kidding aside- this was a very quick and easy dish to make. Yes, I did use those vacuum-packed, pre boiled beet roots. I have no problem with that- if you do- boil a fresh beet, knock yourself out. I used one beet per portion of linguini, which I grated coarsely. I cut a few slices off to use as a garnish too and set them to one side. Put your pasta on to boil according to the packaging instructions... which should be 8-10 minutes. That's plenty of time to do the rest of the prep work. I cut some fennel into fine cubes and grated some ginger finely, as well as crushing a clove of garlic. These were all of the aromatics that I used- apart from some grated nutmeg and Parmesan cheese. And I am going to tell you how to bring everything together right about now...

After maybe 7 minutes, whilst the pasta is still very al dente, drain it and return it to the saucepan, but add a cup of regular milk. No cream. There is no need for it at all as you will see. Add the grated beet root, the garlic, fennel and ginger and grate with nutmeg. Continue cooking and stirring and you will find that the pasta soon absorbs the milk and begins to thicken. Next step is the parmesan cheese, which goes in next with a drizzle of olive oil. This will give everything a nice sheen and will make the paste thick, saucy and smooth. Grate some lemon zest finely and add this, as well as a tiny squeeze of juice and a tiny squeeze of honey. And that's it!

I served it with a simple sprig of parsley, a slice or two of beet, a few scrapings of lemon zest and a generous sprinkle of coarsely ground pepper corns... pretty delicious as well as being totally simple! Hope you all enjoy!

Monday, 26 September 2011

Warming Thoughts

Zuppa di Verdure con Salsiccia
Simple Vegetable Soup with Sausage

After the excesses of the weekend, this evening it had to be something more simple... but no less delicious or filling. A soup was in order, fresh vegetable and a little shredded sausage for a bit of extra flavor... On a cold Autumn evening... what more do you need?

One thing that you definitely do not need, is to open a can or a packet! it never ceases to amaze me that people think they don't have the time to make a soup- this took 20 minutes to make- and let's face it, you need 10 minutes to get your can open and warm anyway!


So, for one large portion of soup- this is all I needed; half of a carrot, half a stick of celery, 1 spring onion, a 2" chunk of zucchini, 5-6 cherry tomatoes and half of a smoked Italian sausage. It's pretty amazing what that will all turn into!

Cut the sausage into fine strips and pop it into your saucepan at a moderate heat, so that it begins to fry in its own juices. Cut the carrot in half lengthways and then into diagonal slices, slice the celery finely, slice the tomatoes and dice the zucchini.

Start off by adding the celery, carrot and onions first, as they will need longer to cook than the tomatoes and zucchini. Add some crushed garlic, tomato paste, salt, pepper, a bay leaf, stir them in and let the brown for a minute and then de-glaze with a cupful or so of boiling water. Don't add too much water all at once- use a smaller amount and let it take in all of the flavors of those simple but delicious ingredients and the tomato paste. Season with a little ground cumin, a little paprika and a little cayenne and little thyme. 


Add more water, reduce the temperature to a low simmer, add the tomatoes and the zucchini and continue boiling for a further 10 minutes. There should be enough flavor developed by those simple ingredients that you do not need any vegetable (or any other kind) of stock to get your soup tasting delicious- everything you need is right there in the pot! I think that you can tell from the pictures that there was no need for any pasta, rice or anything else- that is a pretty rich and satisfying mix as it is. You know- sometimes less is more, usually we overdo it with our food... and now and again a meal like this is simply a good thing to make and enjoy!


Sunday, 25 September 2011

Bang Your Own Drum!

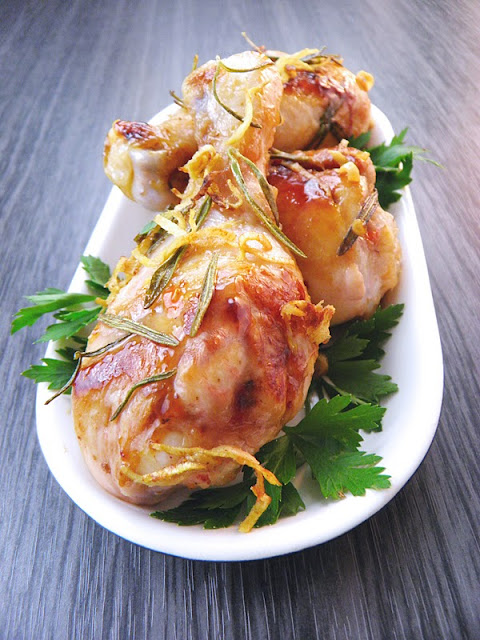
Cosce di Pollo al Rosmarino e Zenzero
Chicken Drumsticks with Rosemary and Ginger


And again, I set out to reinvent and reinterpret some everyday product and to turn it into something delicious and tasty... that's what I do! Or at least it is what I try to do! I think it is a shame when people, in their striving to become more aware of what they eat, go beyond the point of simply becoming "foodies" and instead become "food snobs". Oh it is a wonderful thing to go out there and buy exclusive and wonderful produce and it is noble to insist on it being organically or locally grown. But it is more valuable to be able to work with what you have and to transform it into something special... even something as ordinary as a chicken drumstick!

They may be out of fashion and considered rather passé "party snacks", but the drumstick is good and juicy meat on the bone- which is basically always a guarantee for great flavor. So I decided to capitalize on that and knock the flavor up a couple of notches- and it really wasn't hard to do at all!


First of all, I made  some small cuts into the meat, with a small paring knife, and inserted small sprigs of rosemary- these will ensure that we get good flavors deep into the drumsticks. I then put them into a dry Teflon pan and turned on the heat... they will soon be sizzling away in the fat of their own skin- so there is no need for any added fat. Season with salt and pepper and keep turning, so that the chicken browns evenly from all sides.

In the meantime, chop some garlic finely and cut some fresh ginger into fine strips. Sprinkle these seasonings onto the chicken and continue to fry until they start to brown- and then de-glaze the pan with a little orange juice. This may seem counter- productive, but fear not- that juice will evaporate away in no time and the chicken will continue browning. The thing is, that the juice and the fat from the chicken will combine and create a wonderful, flavorful glaze. By adding the juice, the ginger and rosemary flavors will combine and intensify and in turn, cook into the meat. It's all easy stuff we are doing here!


I repeated this procedure 3-4 times until the chicken was done- it is similar to making a risotto in terms of adding liquid, letting it cook down to nothing and repeating it- but it reduces the flavors down and they become more intense as you go along- it's great! Season lightly with soy sauce as you go along- but you really only need a few drops. You can also add chili or Tabasco to up the wattage if you so wish- but that is completely a matter of taste. You will see juices oozing out from the thick end of the drumstick- they need to be clear before you know they are done- but it is worth the wait! After around 30-40 minutes, you will be rewarded with juicy, sticky, delicious and golden chicken that is packed with flavor. Perfect with a fresh salad, some Asian noodles, or sure- fries... why not? Any way you like them- enjoy them! After all- you just made them for yourself!

A Wonderful Pear

Piccola Pizza con Pere, Gorgonzola, Pancetta, Cipolla & Timo
Mini Pizza with Pear, Gorgonzola, Bacon, Onion and Thyme


Here is a tasty little snack for you- something a little different and perfect for the Fall. With pears in season at the moment, the temptation was a little too much for me and I felt the urge to try something unusual with them. So I came up with this little snack for you... using a store-bought dough, it is done in 15 minutes... without- in the time it takes to make that dough and then 15 minutes! In other words... it is very easy to make!


Cut the dough out, or shape the dough, to the size of a small pizza tray, or failing that, as the case with me, a frying pan. Lay the dough on the pan, turn on the heat and start it baking on your stove top. Whilst that is starting to happen, slice your pear and onion finely, cut some finely sliced bacon into bite-size pieces and crumble a little gorgonzola, ready to go on top.


 After 2 minutes, you should be able to flip over the dough base and lay on your topping. Start off with the pears, then spread the bacon out evenly, onion in the gaps in between and cheese onto areas where the different ingredients overlap- that way, when it melts, the cheese will hold everything down in place... clever, huh?


Bake at a high heat for around 3-4 minutes- it shouldn't take much longer than that. When the pizza is done and lightly brown, fetch it out, sprinkle it with fresh thyme and give it a little grind of chili to give it a bit of kick- delicious! So you see... the Fall coming does bring certain advantages with it... start looking forward to some wonderful new recipes!

Hot House Flowers

Carciofi Ripieni alla Mollica Saporita
Savory Breadcrumb-Stuffed Artichokes


Artichokes are not something that most people eat very often... unfortunately for them! Apart from being healthy, they are deliciously rich and distinctive in their flavor. Most people only know the tiny artichoke hearts sold in cans or jars, or if they ever do eat artichokes, they feel a need to dip them into something- which I have always found to be rather awful! That's not the way we do it in The Old Country! And neither is this! But it is based on a preparation from the days of the great depression...

I saw a documentary on an old Italian lady online a while ago, talking about the food she used to prepare after the war, where produce was few and far-between. She showed how she used to prepare artichokes, by loosening up the leaves and packing breadcrumbs in between. Back then, they would have maybe a little onion and garlic, a little rind from some hard cheese and some parsley if they were lucky... these would have been the flavorings, which in themselves would not taste bad even today! Those clever Italians! 


But being as I am neither depressed, nor worried about where my next meal will be coming from, I am going to show you how I made a slightly more elaborate version of that dish, with a whole lot more flavor- but still incredibly inexpensive. So here we go...

First of all, lets prepare those breadcrumbs for our filling. I used finely chopped onion, garlic, parsley, mint and sun dried tomatoes. I then grated in some lemon zest, parmesan cheese and nutmeg. To make everything a little more filling and satisfying, a little chopped bacon and to keep it moist and juicy, some sliced cherry tomatoes. Yum!  Mix everything together well and  get your water boiling in your saucepan- all we need to do now is to stuff that artichoke and we can get cooking!


There is a little prep work involved with the artichoke, but it is really simply. Cut off the stalk and a little of the base, so that you have a flat surface to rest the artichoke on. Now, trim the ends from the leaves- the tips are inedible anyway, but by cutting them off, you allow steam into the leaves which makes them cook better and faster. 
Spread the leaves out a little and then start filling the spaces in between with the breadcrumb mix- make sure to stuff the artichoke generously and to press it closed again to keep everything in. So now we are ready to steam this baby... it is going to take a while though... so be prepared!

Use a saucepan that is not much larger than the artichoke and fill it with water, up to the level of the first leaf- you don't want the breadcrumbs to be covered with water. I put a few slices of lemon into the water- this reduces any discoloration, as the artichoke will need at least an hour to cook and in the meantime could possibly lose its nice coloring. I didn't salt the water or season the filling, as the bacon and sun-dried tomatoes have enough flavor in them in my opinion. 


I would recommend a nice glass or two of Cynar whilst that beauty steams- a wonderful Sicilian aperitif- made of artichoke- rich and faintly herbal in flavor- delicious!

After an hour, take a look and see how things are looking. The artichoke is ready when you can easily pull out the leaves... if the leaf is not coming out- the thing needs to stay in!

Once it is finished, take the artichoke out of the saucepan, give it a light drizzle of olive oil, a sprinkle of pepper, and put it under the broiler for a minute or two, so that breadcrumbs crust-over slightly. They will be moist and bursting with all of those good flavors underneath! Yum! Pull the leaves off and scrape the fleshy part off, along with the breadcrumb mixture, with your teeth... it's a little bit messy- but it's a lot of fun! And perfect for a romantic meal... it has that aspect of "she loves me, she loves me not..." to it!

But I for one am pretty confident that YOU will love it!

Saturday, 24 September 2011

Deliverance

Fegato di Vitello alla Veneziana... piu o meno...
More or Less Venetian-Styled Veal Liver


Ok, I have never been to Venice, or even the planet Venus, but I based this dish on a preparation I saw on a tv show, that claimed to be the traditional Venetian method. Usually, the recipe is nothing more than the typical liver and onions that we are accustomed to, with a rich gravy and usually served with polenta or simply some white bread. The dish I saw included celery, carrots and potatoes and was finished with balsamic vinegar. So with that as my inspiration, I decided to do my own thing and to make a slightly more elaborate and refined dish. And the way I did it went something like this...

I started off by peeling and slicing my carrots and celery. The potatoes I scrubbed, but kept the skin on as I prefer the flavor that way. I popped the potatoes and carrots into my frying pan with a little water, and pre- cooked them for 3-4 minutes, after which I added some sliced carrots and celery. So having a little head-start on the cooking time, I moved on with the rest of the preparation which went very quickly.


 I added a few slices of spicy sausage to the mix and then turned the heat up high- the idea was to get the sausages nice and brown and to flavor the vegetables with their juices. As soon as I heard the sound of sizzling, I added some crushed garlic, fresh rosemary and oregano and turned down the heat so that they could continue to cook and brown whilst I got the liver and pears ready.

The pear was simply sliced thinly and sautéed in a little butter, with some coriander powder, salt, sugar and pepper. I gave it 2-3 minutes on either side and then moved on to the live.

I cut the liver into bite-sized chunks and coated it in flour, before frying it in a hot pan. As soon as it was browned off on the first surface, I dusted it with oregano and pepper and flipped it over till it was browned off on all sides. Season with salt but do not use salt until the end, as it will make the liver tough. Next step was to add the spring onion and a little honey and balsamic vinegar... and it is at this point at the latest that things became really delicious...


Now doesn't that look and sound good? And you know what? it was! All I had to do was to serve it all up together- a little of each ingredient and a little side-salad of German field greens... delicious!

Friday, 23 September 2011

Other Fish to Fry...

Salmone con Zenzero, Limone & Pepe su Puré di Patate + Spinaci
Ginger & Lemon-Peppered Salmon on Colcannon and Spinach


Friday night in Frankfurt and the fish is in the pan, sizzling in clarified butter, with lemon and ginger-infused crushed pepper... mmm! Whoever would have thought that possible? It still comes as a surprise to me that I am making these fish dishes for myself, as fish will seldom land at the top of my list of favorites. Still, I have always prepared it happily for friends and wouldn't want to keep it from you- and this is how I went about preparing a nice piece of wild salmon in a way that I enjoyed for myself as well...

The creamy mashed potato you are lookingat at is based on a traditional Irish Colcannon, which is a mix of mash, cabbage greens and spring onions. I used kohlrabi and kohlrabi leaves to make mine- it just happened to be what I had in the fridge- and it worked just fine. Chop the greens up relatively finely and boil them, together with some chopped potatoes for 15 minutes. After this time, mash them together, add some sliced spring onions, season with salt, pepper and nutmeg and a little finely chopped garlic, add enough milk to bring them to a nice, creamy consistency. Add a little butter and keep the on a lowheat until we are ready.

The spinach was very finely chopped and then sautéed in butter, with some finely diced shallots and a little garlic. Season with salt, pepper and again a little nutmeg, add a little milk and allow to simmer at a low temperature... we are getting there- don't worry! There is only that nice salmon steak left to take care of now...


For the salmon, I prepared a little seasoned salt again- this time using black and Szechwan pepper corns, chili flakes, rock salt, lemon zest, coriander seed and a hint of brown sugar. Grind these ingredients together with a mortar and pestle and keep them ready- it's time to make that fish really delicious now... but first we need to prepare our last flavoring, which is a little very finely chopped fresh ginger. I didn't mix it into the seasoning, as it would have added too much moisture and turned the dry spices into a paste- but we will sprinkle this onto the fish as soon as it is frying. So heat up the pan with a little oil and fry the salmon from the reverse side for maybe 1 minute. Sprinkle generously with the seasoning mix and the ginger, turn it over and season the other side, add another little pat of butter and turn up the heat. Fry for a further 1-3 minutes at this high temperature and then turn off the heat. The fish will be perfect, continuing to cook in the remaining heat, in the time it takes you to lay out the potatoes and spinach. It will also have slightly caramelized all of those flavors into a light crust by then... be prepared to smile once you turn that fish over- it is going to look divine... and taste just as good as it looks!

Thursday, 22 September 2011

All Greek to Me!

Spezzatino di Kritharaki (Risoni) con Pomodorini, Zucchine e Gamberetti
Kritharaki (Risoni) Soup with Tomato, Zucchini and Shrimps


Rich, smooth, spicy and delicious, are just 4 words I could use to describe this evenings dish... but I can think of a whole lot more! Quick and easy to make, this is the perfect dish for the cool Autumn evenings, when you just want to get home, get warm and dig in to a satisfying and warming bowl of soup.

I used those little Greek noodles, "Kritharaki" or "Risoni" as they are also known- and it was a first for me. Shaped like somewhat larger, flatter, rice corns, they are ideal for making soups or salads. They have a nice bite and a silky texture- perfect  for a nice, unctuous dish like this one.

I started out with finely diced bacon, celery, carrot and onion, which I sauteed together in a deep frying pan. I wanted to prepare this soup in a similar manner to a risotto or paella and the larger surface area seemed like a good idea to me, as it would allow the rice to be exposed to a larger area of heat and thus to cook more quickly. And of course I was right.

Once the onion becomes translucent, add the noodles and some sliced cherry tomatoes, chopped garlic, tomato paste and oregano and stir well together. One handful of noodles per person should be enough for a decent serving. Season with salt, pepper, nutmeg and a little Herbs du Provence and set to simmer at a moderate heat, stirring occasionally.


As the noodles cook and grow in size, they will also thicken and bind the soup nicely. Don't forget to add a pinch of sugar or a drizzle of honey, being as you are using fresh tomatoes, otherwise the soup will have a slightly sour flavor.

Add the shrimp about 5-6 minutes before you are ready to serve- I find that they stay juicier tasting if they are cooked directly in the soup and not fried sepearately. And we are almost ready to rumble! The finishing touch was a few leaves of fresh oregano and a sprinkle of ground chili flakes and maybe a light drizzle of olive oil. And a great Autumn dish was finished and ready to be enjoyed... and I certainly hope that you do!

Wednesday, 21 September 2011

Oven-Baked Autumn Pasta

Rigatoni con Carne di Maiale Tritata, Funghi e Pancetta
Rigatoni with Ground Pork, Mushroom and Bacon


Tonight I put together a nice simple dish of pasta, ground pork and mushrooms... a few herbs, a sprinkle of bacon and a splash of white wine... and again realized that sometimes the simple things really are the best. Oh my! What a delicious and satisfying meal! The only real prep-work involved, was soaking the dried King Oyster Mushrooms that I used- which took maybe 20-30 minutes. Otherwise, the whole meal was finished in 20 minutes!

So- get that saucepan on the stove and your pasta boiling before we start with the fun stuff. First off, we are going to sautée those mushrooms with the diced bacon until they get nice and brown- so make sure you wring them out well after soaking them. Once they are done, after 2-3 minutes, set them to one side for later. Now, using the same frying pan, add the ground pork, a fine dice of carrot, celery and spring onion, and fry them at a fairly high heat until they begin to brown. De-glaze the pan with a splash of white wine and add some crushed garlic, parsley, cumin seeds and finely chopped rosemary. After 2-3 minutes, grate generously with nutmeg and add a cupful of milk, stir well and allow to render down a little into a nice "sauce" of sorts.


After around 10 minutes cooking time, the pasta should almost be good. Drain it and pour it into the frying pan to finish cooking in all of those good flavors. You will find that as the pasta continues cooking, it will absorb some of the liquid, whilst at the same time giving off starch which in turn thickens it. So, after the full cooking time, the wine and milk should have reduced down nicely together and with the fresh herbs and nutmeg, have become a mild and tasty sauce. Season with salt, pepper and add a little extra virgin olive oil. And dinner can be served!


Tuesday, 20 September 2011

Autumn Chestnut Burgers

Frittelle di Castagne, Pancetta e Cavolini di Bruxelles con Pomodorini e Zucchine
Chestnut, Bacon & Brussels Sprout Fritters with Cherry Tomatoes and Zucchini


I wanted to try a little experiment tonight... I had a bag of chestnuts that had been seeking my attention for quite a while now and tonight its time had come. I initially thought of a soup and thought that bacon would go well with it, as would thyme as a herb and Brussels sprouts as a green. But then I thought I could not post another soup, 2 nights in a row for you- I can't have you getting bored now, can I? 


Still, I thought that it would be a good combination of flavors and set out to use the same ingredients in a different way... and thus, my chestnut fritters came to be!


The chestnuts I had were of the pre-boiled, vacuum-packed variety- which are wonderful, versatile and convenient to work with. I had thought of using chestnut flour and cooking up a kind of polenta, letting it set and then frying it in olive oil with thyme and garlic. But as always- time is short in the evenings and this leads to me innovating and experimenting wherever I can. And this is how I did it...


I put the chestnuts, around 10-12 of them in all, into my blender, with some onion, parsley, thyme, garlic and cumin. I then added 2 eggs and blended everything together. I seasoned the mix with salt, pepper, nutmeg and a little cayenne and scraped it into a bowl. I then added some breadcrumbs in order to make the mix a little more stable- something similar to the consistency of a risotto or rice pudding. I thought of adding a little more breading into the mix, but decided against it as the chestnuts already have a rather "mealy" consistency to them and I wanted something a little lighter. At this point I also added the Brussels sprouts, which I cut into slices and then blanched for 2-3 minutes in boiling water. I added 7-8 of them into the mix. The mixture was still pretty soft, so I decided to spoon the dough into the pan, rather than shape it like a burger or meat ball.

As I constantly strive to cut down the fat in my dishes to a minimum, I thought of a clever way of doing that too... Rather than mix the bacon into the chestnut/egg mix, I cut it into small pieces and used it to grease my pan as well as to season the fritters. I set a couple of pieces onto the hot frying pan and then spooned some of the chestnut mixture on top and then put another couple of sliced of bacon on top. This way, the bacon starts frying and the fat it gives off helps to flavor and season the fritters- clever, huh? They should be ready to flip after 2-3 minutes- then do the same from the other side... easy!


Whilst the fritters were browning gently, I sautéed the tomatoes and zucchini,in a little butter, thyme, garlic and olive oil. So this is a pretty simple meal! But the combination of sprouts, bacon and chestnut... very Autumnal but yummy and delicious. Real "comfort food" you might say!

Monday, 19 September 2011

Poor Thing!

Minestra di Pasta Siciliana con Lenticchie e Pomodori Secchi
Sicilian Pasta Soup with Lentils and Sun-Dried Tomatoes


It has almost been so over-done now, this thing of "rediscovering"  so-called "peasant food" or "cucina povera" as it is called in Italy- the "poor peoples food" that foodies love to brag to their friends with now and then. The truth of the matter is, that a good cook will make you an exquisite meal out of even the humblest of produce. My mom used to create meals, from next to nothing, and keep all 9 of us kids fed and healthy and I have never forgotten the lessons I learned from her.

This is my version of one of my favorite Sicilian noodle soups- a little different to what my mother would make (well, actually quite a lot different!), but delicious, inexpensive and easy to make. And I somehow thing you may enjoy it too...

I started out with some finely chopped bacon, celery, onion and carrot, which I sautéed together in, you guessed it, a dry Teflon pan. This will bring the flavors out of those simple ingredients and make sure that you get a tasty broth for your soup. Ok- the other ingredient that I used was kohlrabi... I still have a whole half of one left over- and with this kind of soup, you just use whatever vegetables you have handy. The basic must-have for a minestra of this sort are carrots, celery, some kind of leafy greens and of course some kind of pasta. I used both the kohlrabi itself and the leaves for this. I would say, a 1" slice of kohlrabi cut into a dice and 1 leaf per person... that is more than enough. Once those ingredients are starting to cook, add a little finely chopped garlic, the kohlrabi cubes and leaves and the lentils. I used one handful of lentils per person. Cover them barely with water and let them boil for 5-6 minutes. Season with salt and pepper, a little thyme and a squeeze of tomato paste. 


Now is the time to add your noodles. You can use an kind of short noodle that you prefer, but I always liked the short bits of spaghetti the best- and the trick my mom taught me to snap them up really quickly. Take a small handful of spaghetti and roll it up in a tea towel. Holding both ends tightly, lay the spaghetti on the edge of your table or kitchen counter and pull it over the edge, so that the pasta snaps but the pieces remain in the towel... it's a lot of fun actually! Add the pasta into the vegetable broth and a few small slices of sun-dried tomato. Reduce the heat and let the pasta cook for 10-12 minutes.  


After this time, the pasta should be almost ready- so taste it for salt and adjust your seasoning if necessary, and add a nice splash of olive oil. Wait until you are ready to serve the soup as the nice fresh aroma of the oil would be lost if you added it earlier. Serve piping hot with some peperoncino or Tabasco and enjoy with a nice glass of chilled white Corvo... delicious!

Sunday, 18 September 2011

The Color of Home- Orange!

Arancini Siciliani al Forno
Oven-Baked Sicilian Arancini


It truly was a case of love at first bite for me with Arancini. I remember the feeling of total satisfaction back then and it is no different today. Even as a child, the combination of crispy breadcrumbs on the outside, hot, tasty saffron rice on the inside and the deliciously juicy ground meat filling at the center of it all was simply wonderful. I tasted my first one as a small child, in Sicily and it will always be the defining savory snack of the island for me. Forget your pizza, forget your pannini... the word on the streets is Arancini!


The only "problem" I have ever had with arancini, was the fact that they were deep fried. And the only reason I had a problem with that was that I have struggled with my weight most of my life. So for most of my adult life, I have avoided fried and fatty foods- easy for me when it comes to a lot of things... but not my arancini! So imagine my feeling of triumph this evening after having managed to create a version that can be baked in the oven!


I am going to go out on a limb now and claim that arancini were invented as a method of using leftover risotto. If that wasn't the case- oh well! In any case it is what I would recommend you doing- because although leftover risotto really is not worth heating up, because it would overcook- this way you can put it to good use and make something altogether more special out of it. But you can also make up a simple risotto from scratch and use that. Using a chicken or vegetable stock prepare a risotto- skip the steps of using onions and garlic and wine etc- just a bland saffron and broth affair is all you need. That and enough time for it to cool off. And in the meantime you can prepare the tomato/meat/peas sauce filling.


The sauce is in itself also a single affair- a classic "sofritto" of carrot, celery and onion, a little finely chopped pancetta, some ground mixed beef and pork, a little garlic and a hot saucepan make for a good starting point! Add tomato past to this and de-glaze the saucepan with a little red wine. Now add some tomato juice and some frozen peas. Not too much liquid, as we want the rice balls to hold together well later. Season with basil, oregano, salt and pepper and simmer for a good 30 minutes. And then this needs to cool down too!

There are 2 schools of thought when it comes to forming the arancini- some people will mix an egg into the rice, in order to have it stick together better and others don't. Tonight I didn't. The name "arancini" is of course derivitive of the fact that they are of the same size and golden color as an orange when they are finished. So let's start by dipping our fingers into some water, so that out hands don't stick, and forming balls of rice of about the size of a small orange. Flatten the rice down a little and form a hollow in the center. Fill each rice ball with about a teaspoon of the meat and a few chunks of cheese. I used ricotta, but you can also use mozzarella, parmesan or any favorite you may have. Now press the ball gently back into shape and take a pinch of the risotto and pat it over the opening to seal it. Keep pressing the ball into shape and then roll it in breadcrumbs. I added a little grated parmesan and finely chopped parsley to the crumbs, as well as a little grated nutmeg. Again- you could dip it into egg first, to coat the rice balls. but I found that they stuck to the moist rice just fine.


I baked mine in a moderately hot oven for around 30 mins. The important trick is to pour some olive oil onto your oven tray and to either spread it around with a brush... or failing that, your fingers. Now lay the arancini onto the lightly greased tray and roll them around. This should insure that they get a light oil coating and that the breadcrumbs become golden and brown. Nothing needs to "cook" anymore- it is just a matter of bringing everything back up to temperature and of getting those breadcrumbs toasty!

They ARE a little delicate, so handle with care... but I managed to do so without them falling apart- and you have to be equally careful with them even if you prepare them in a deep fat frier. But if you are a little careful, you will be rewarded with wonderfully satisfying, comforting and simply GOOD arancini! Just like in the old country! But without the fat!