Monday 30 April 2012

Oven Baked Steam Rollers!

Rotoli di Tortilla al Forno con Ripieno di Patate, Cimi di Rapa, Olive, Pancetta e Formaggio
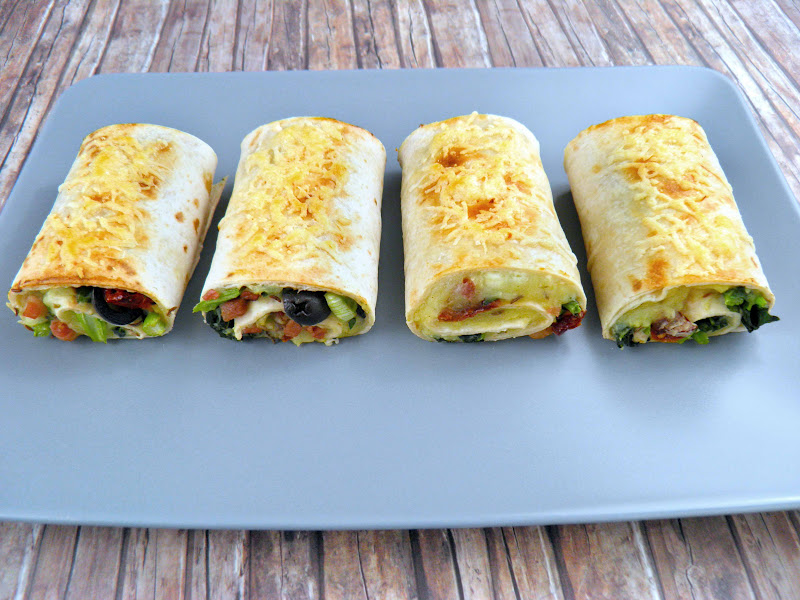
Baked Tortilla Rolls with Potato, Broccoli Rabe, Olives, Bacon and Cheese


Here is another simple and yummy idea for you, perfect for a Summer snack at lunch time, for a picnic, party-treat... you name it! And so easy to make using super-versatile tortilla's to wrap this tasty filling in and then bake until crispy and brown on the outside, whilst remaining succulent and delicious on the inside... mmmh!

These little snacks taste wonderful hot or cold and the filling is based on my favorite ingredients of a Sicilian "schiacciata". I just decided to use the tortilla's rather than a pizza dough to make these- so they would be lighter, more convenient... and just plain easier to make! And this is all there was to it...


I started off by steaming a couple of potatoes- I steamed them rather than boiling them, because I am wanted to steam the broccoli rabe and saw no reason to use two saucepans! Plain and simple! So after 8-9 minutes of steaming the potatoes I added the broccoli rabe, which was cut into bite-sized pieces, to the other side of the steam rack and continued steaming for 5-6 minutes more. By that time both the potatoes and the broccoli were good and ready to be prepared for that filling!

In a small frying pan, I heated up finely chopped bacon, sliced black olives, a teaspoon of cumin seeds, a little finely chopped garlic, a finely sliced Spring onion and some diced sun-dried tomatoes. Once the bacon was slightly brown, I turned off the heat and got busy with the rest of the ingredients...

I mashed the potatoes coarsely and seasoned them with salt, pepper and a little nutmeg, then added the broccoli rabe and a little bit of olive oil. Next came a few herbs which I chopped finely and added to some fresh, creamy ricotta cheese- I used parsley, rosemary and chives and stirred them into the ricotta with a little salt for seasoning.


I spread the tortillas with the herb-ricotta and then spread some of the mashed potato and broccoli on top of that. A little extra nutmeg and cumin seed and then a sprinkle of the other fried ingredients, spread evenly to cover the whole of the tortilla. I then rolled the tortilla up tightly and carefully and cut off the end pieces, then split the remaining rill into two. Simple.

I laid them onto a baking tray with the end-side down, so that they remained closed. Into the oven they went at 300°F for around 5 minutes, after which I removed them, turned them over carefully, drizzled them very lightly with olive oil and sprinkled them with just a little parmesan cheese. The next 3-4 minutes of their existence was spent under the broiler... until the cheese melted and the rolls became a lovely and crispy golden brown... delicious!

I ate mine straight away as you can imagine- piping hot and wonderful! But remember... they will also taste wonderful the day after, cold from the fridge on a hot Summer's day! If they are around that long that is!


Sunday 29 April 2012

Thin-ternational!


Tortilla al Forno con Ricotta Fresca, Cipolle in Aceto Balsamico, Pancetta, Olive e Timo
Baked Tortilla with Cream Cheese, Balsamic Onions, Bacon, Olives and Thyme


Is it a pizza? A tarte flambe from the Alsace? No it is a tortilla- and a deliciously different one at that! This was a quick snack that I put together as I was a little pushed for time this evening... I DID want to get out to the movies. But even though I might have made it on time, I decided to give it a miss this evening instead. Because as soon as this was ready... I realized that it would have been much too much of a shame to rush it! This was something so delicious it was worth sitting down and taking the time to enjoy properly!

The main and most important ingredient here is of course the little onions that are pickled in balsamic vinegar and dressed in a nice olive oil. You can of course use regular pickled onions and add olive oil, a little balsamic vinegar and some honey... but I was lucky to have these here and was already to go!


I cut the onions into 1/8th's, diced the bacon and sliced the olives. So far so good! I then spread the tortilla with cheese curd (you can use any kind of cream cheese or ricotta that you like) and sprinkled them with the finely diced bacon and the olives. I added the onions and then pushed it into the oven at 400°F for 5-6 minutes... it didn't take much doing and sooner than I thought- there it was- finished, crispy and delicious!

I sprinkled the finished tortilla with fresh thyme and cut it into 1/8 ths, which would make it easier to eat. Of course, being so very thin, probably the best way to do so was to roll the little slices up- which is exactly what I did! Excellent quick and easy finger-food I would say!
Hope you enjoy trying them too!


So there you have it... a decidely European approach to a Mexican tortilla! But you know what fellow readers? If it is good food, it is all very fine by me! I see a couple more variations on the horizon... so keep your eyes open! It may well happen sooner than you think!


An Egg-cellent Brunch!

Patate Dolce Grattuggiate, con Uovo in Camicia, Radicchio di Treviso e Dragoincello
Sweet Potato Hash Browns with Poached Egg, Radicchio di Treviso and Tarragon


It sometimes really is the little things that matter. And generally speaking, a lot of us do tend to over-eat a little. Sometimes a small but tasty dish could be much more satisfying, if we take the time to enjoy some great flavors. And that does not mean that things have to be complicated to look spectacular, taste amazing and make a great impression on your guests.

Take this dish for example... quick, very inexpensive and totally easy to make, is a great alternative to the same-old same-old... whereby it is in fact exactly that! Hash browns made a little differently, from grated sweet potato, a simple poached egg ad a little side-salad of sorts. But with just enough of a twist to make it special and so very, very good...


I started off by grating the sweet potato. I used a half of an average size potato per person. Half of a spring onion, a little finely chopped mint, a little finely chopped parsley, salt, pepper, nutmeg and a little finely chopped bacon... and into the pan it went! I stir-fried it until the bacon began to give of it's fat and juices and the potatoes slowly began to brown. I didn't add any extra fat until the potatoes changed color... this is a sign that they are almost done... and at this point I added a touch of olive oil, just to give them a slight glaze and a light olive flavor.

The egg was simply poached in the usual fashion, in a saucepan of water to which I had added little splash of white vinegar. Once the water had come to the boil, I added a hint of salt, took it off the heat and gave the water a stir until it began to swirl. I cracked my egg into a ladle and drop it carefully into the center of the swirl, and the motion of the water made the egg-white swirl around the egg yolk, enclosing it nicely and keeping it in shape. I let it simmer for 3-4 minutes before serving as I do not like my egg to be too runny- that of course is a matter of taste though!

I had some cute little baby radicchio which I chose to use for this dish, just for visual reasons, but the regular radicchio or even endives are just as good. I added tarragon and parmesan cheese to this to make my side- salad and seasoned it with a little salt, then dressed it in a little honey, a drizzle of olive oil and a light squeeze of lime juice... in the combination- delicious!

I served the poached egg on top of a bed of sweet-potato hash, which I patted into shape, seasoned with a little salt and pepper, added a drop or two of olive oil... and that was that!
Brunch was finished and ready to be served... and a real treat it was too!


Chunky Monkey Breakfast Soufflé!


Soufflé di Colazione, con Cacao, Banana e Mandorla
Rich Cocoa, Banana & Almond Breakfast Soufflé


Okay... so this contestant would not win any prizes at the beauty pageant, but you know... you shouldn't always judge a book by it's cover! Granted, this books cover may be a little bit more King Kong than Fay Wray- but still! It is the inner values that matter the most!

And what is on the inside of this lumpy-looking soufflé (of sorts) is a lot of rich, chocolatey goodness, almond flavor and chunks of banana- and if that doesn't sound like a real treat at breakfast-time, then I don't know what is!

This is another of my "I can't bake, but I am going to do it anyway" inventions and it works! I love that! Healthy too, with no added fat, no added sugar and containing just one egg per generous serving... you have GOT to like that!


So this is what you do: separate the yolk from the white and whisk the egg white into stiff, white peaks. Don't forget to add a pinch of salt, as that will give the egg white more stability!

Whisk the egg yolk and add 3 tablespoons of yogurt, 2 tablespoons of cocoa powder, 2 tablespoons of ground almonds, 1 teaspoon of baking powder, half a teaspoon of Stevia, a little cinnamon, a hint of nutmeg and around 2 minutes of good mixing!

Once everything is nicely mixed, scoop it into the egg-white and stir it in gently. Pour the mixture into a ramekin and then add your banana pieces, dropping them at regular intervals and even spaces and letting them sink down slowly. If you put them in any other way, they would immediately sink to the bottom... this way you get them evenly distributed throughout ;-)

Bake in a pre-heated oven at 400°F for 25 minutes. Brew that coffee. Grab your newspaper.  Fetch that finished little chocolate treat out of the oven. Pour your coffee. pat yourself on the back... and after giving it 5 minutes to cool down a little- enjoy!


Saturday 28 April 2012

Flowering Inferno

Fiori di Zucca Ripieni di Couscous, Pancetta, Olive, Ricotta e Menta 
Zucchini Blossoms filled with Couscous, Bacon, Olives, Ricotta, Tomato, Mint and Lime


Oh, don't worry! There is no eternal damnation involved in the preparation of this dish- just some devilish delight in the eating of it! This is my third foray into the world of the zucchini blossom and I must say that my enjoyment grows every time I try them!

I decided to make another couscous filled version, but added a few more ingredients to make it richer and more satisfying... and turned them into a wonderful Springtime dish that I am sure you will enjoy too!

Obviously, the first thing we need to do is to prepare the filling and it went something like this: 1 cup couscous, 1 red lentils, 1 cup of fresh ricotta or cheese curds, 1 Spring onion, 1 cup finely chopped bacon, 5-6 black olives, 5-6 cherry tomatoes, parsley, lime juice and mint. Sounds like a delicious combination, right? 

I soaked the couscous in boiling water, along with the finely chopped spring onion, 1 teaspoon of paprika, a little chopped garlic, salt, pepper and a few finely ground fennel seeds. It takes around 10 minutes to become nice and fluffy and in the meantime I fried the finely chopped bacon until it was toasted and crispy.


I added the bacon to the couscous mix, along with the cheese curd or ricotta, the herbs and also the juice of half a lime. I stirred everything well and turned my attention to the blossoms, which need one little thing doing. Very important with the prep-work is that you must remember to remove the stamen from the flower... no one wants that!

Spoon the mixture into the flowers and press into shape- then drizzle lightly with olive oil and bake in a hot, pre-heated over, at around 250°F for 7-8 minutes, then flip them gently over and continue baking under the broiler for 2-3 minutes until everything is lovely and brown!

I enjoyed mine warm, but they taste just as wonderful eaten cold as a salad... and as a good friend of mine is accustomed to saying, "it's all good!"

Hope you enjoy it!


Friday 27 April 2012

Berry Nice Indeed!


Budino di Riso con Limone Verde, Cocco e Composta di Frutti di Bosco e Cumquat
Lime & Coconut Rice Pudding with Berry + Cumquat Compote


Yes, there is such a thing as sweet comfort food and this is what it looks like. At least it is what it looked like this evening- and it tasted every bit as good as this looks too! I think one of the most important aspects of comfort food is that it is easy to make and it doesn't come much easier than this! Or more comforting for that matter!

So grab your saucepans and a couple of handfuls of rice, some frozen berries and the juice and zest of 1 lime and join me in making this dishful of fruity and creamy goodness... I promise you won't regret it!


The rice pudding was made by boiling a short-grain pudding rice in milk, together with a little cinnamon, cardamom and the juice and zest of 1 lime. I sweetened mine with Stevia- healthy and fantastic! But feel free to stick to sugar if you prefer- and also if you have less problems maintaining your slender figures than I do with mine!

I cooked and continuously stirred the rice for around 20 minutes- it all depends on which type and size of rice grain you are using. Keep stirring until the rice begins to lose its structure and develops a creamy and smoother texture. I added no cream or anything like that to mine- it tastes wonderful as it is and is a good feeling to know that what you are eating is sensible and healthy, whilst being delicious and fun!


I made the berry compote in less than 10 minutes too... and I know there are lots of great fresh fruits and vegetables out there in the world for us to chose from, but having some frozen mixed berries at home sure is a helpful thing when it comes to deciding to be spontaneous. I started out though, with 4-5 cumquats, which I diced finely and sautéed in a little bit of butter, with just a hint of grated ginger, a tiny pinch of salt and a couple of tablespoons of honey. 

Next, I added a couple of handfuls of frozen berries, a shot of Cointreau and a little orange juice... and of course this would still work if you were cooking for children- just omit the alcohol and it will be fine with just the juice on its own. I then added a teaspoon of cinnamon and a tablespoon of instant custard powder. After stirring this in well, the juice began to thicken nicely. I added a little milk and reduced the heat to a simmer and let the compote thicken and reduce for 3-4 minutes.

This tastes wonderful hot or cold and is instant sunshine and good mood stuff... you're going to like it I'm sure! I know that I did in any case!


Thursday 26 April 2012

Pepperiffic!

Peperone Piccante in Farina die Ceci "Subzi"
Spicy Bell Pepper and Gram Flour Subzi


I stumbled upon this dish whilst browsing along on the information superhighway today... the name caught my attention- "subzi"... isn't that just fun? I took a look at what the story was behind it and thought it sounded easy and fun- my two favorite attributes of any meal!

Basically, subzi is a pan-roasted, spiced gram flour crust for bell peppers. Every version I saw of it used diced peppers- so of course I sliced mine. I also used slightly different spices. Please feel free to look up one of the more authentic recipes if you wish- or stick around a while and read my simplified and easy version. I am all for adapting recipes though and not a fan of passing them on second hand- where is the fun in that? And it's not just girls that wanna have fun you know!

So let's get started. Take 1 cupful of gram flour and add to it 1 tablespoon of garam masala, 1 tablespoon of tandoori powder, 1 teaspoon of turmeric, 1 teaspoon of fennel seed, 1 teaspoon of ground cumin and 1 teaspoon of chili flakes. Stir in well and add a tablespoon of sesame oil. Already we have departed from tradition, but I think that the flavor os sesame goes fantastically with the peppers and chick peas.

Rub the oil into the flour with your hands, so at to get it relatively evenly distributed. Now pout the flour into a dry pan on a moderate heat and stir, stir, stir! After about 4-5 minutes, the flour will begin to change color and you will notice a difference in the smell- it begins to develop a lovely, nutty, chick-pea and spice aroma. You may hear some of the seeds added to the flour popping with the heat! I told you this is a fun dish!


Remove the flour from the pan, wipe it down a little so that you don't have any residues in there that will burn and add a little clarified butter and the mixed bell pepper slices to the pan. Sprinkle with a little sugar, sea salt and lemon juice and sautée for 5-6 minutes until they begin to soften.

Now return the flour to the pan and stir everything together well. The flour will stick to the peppers in part, due to the fact that they are moist, and also it will begin clumping together... which is normal! In fact- you want that!  Because those little lumps of flour and moisture will become lovely, aromatic crumbs of crispy chick-pea flavor!

In order to encourage this, sprinkle the peppers lightly with water and immediately stir everything together... you will soon see more and more little chick-pea clusters. Keep stirring, keep toasting and add a good squeeze of lime juice to the mix- this will really lift the flavors and make everything much fresher and delicious!

After a further 5-6 minutes it should be ready to eat!  I enjoyed a little dip of chopped cucumber, onion, plain yogurt, a drizzle of sesame oil, salt and pepper. The whole thing is healthy, nutritious, cheap, colorful, easy to make and just simply damned delicious!  Serve with a sueeze of lime and a sprinkle of sesame... and enjoy!

Wednesday 25 April 2012

Para-Norma Activity

Penne alla Norma
Penne with Aubergine, Tomato & Basil


This is my version of the classic Sicilian dish of pasta "alla Norma", which is a simple dish of pasta with tomatoes, aubergine and basil. Sicily's famous theatre director, Nino Martoglio, thought it was so exquisite in flavor that it equaled his favorite of all operas, Bellini's "Norma", and so gave his favorite dish the same name. Now... my parents happen to live in the street of the same name as said director! So I dedicate this evenings supper dish to him and his favorite opera! And THAT'S what I call a tribute!

It is also what I call a really, really quick and easy dish- which is my favorite part of this particular story! So let's get cracking and let's make wonderful music together in the kitchen!


This is SO simple! Slice the aubergine thinly and sprinkle with salt. Put it to one side for 9-10 minutes, until the salt begins to draw the bitter juices from the aubergine- then wring them out carefully, rinse them very briefly and pat them dry with a paper towel.

Start your pasta boiling and get yourself a frying pan nice and hot! Ad a splash of olive oil and the aubergine slices and stir immediately, so that the oil gets distributed evenly on all of the slices. keep the heat high and keep tossing and stirring. Add a little chopped garlic, and some finely diced onion, a light dusting of nutmeg and some black pepper and keep on stirring.

By the time the pasta is cooked, the aubergine should be nice and brown. Drain the pasta, but retain a little of the water, and transfer the lot to your frying pan. Add some sliced cherry tomatoes and a good pinch of finely chopped parsley. Stir well together and add a little more olive oil, to give everything a nice glaze and a fresh olive flavor.

Serve with plenty of fresh basil and some god parmesan cheese! There is plenty of drama in opera... I definitely don't need any when it comes to cooking! This is my kinda dish! I think you might like it too!
 

Tuesday 24 April 2012

Sweets for My Babies!

Carciofini e Patate Dolce Gratinate alla Menta
Minted Baby Artichokes and Sweet Potato Gratin


It is almost a crime to eat them, those adorable little baby artichokes! So young and sweet and tender... but sometimes it is fun to sin- especially in the kitchen and at the dining table! I couldn't resist when I saw these little beauties at the indoor market on Saturday- they were the soft, purple round variety, which are just so much more tender...

There are any number of traditional dishes combining artichokes and potato in Italy, but I wanted, as usual, to do something just a little different. So I decided to use sweet potatoes for mine, to compliment the mild but earthy flavor of the artichokes and the freshness of the mint- and they tasty molto buono, even if I do say so myself!

The preparation was very simple- first of all, I plucked off the outer layer of leaves from the artichokes and peeled the stem. I trimmed down the largest, bottom leaves, with kitchen scissors, to about half way, removing the woody end parts of the leaves. I then cut away about a half of the upper leaves, trimming them down to the juiciest part in the middle. Why cook what you don't want to eat anyway?

I cut the artichokes in half and split each half into quarters, so that I had small, bite-sized slices. I immediately placed them into a mixture of water and lemon juice to prevent them from discoloring. I am not sure if this is true for all baby artichokes- but these were so tender and small that there was no "choke" so to speak of that needed removing... lucky me! You may want to check the middle of yours to see if there is any of that fine, flossy and troublesome stuff that you can quite simply cut or pull away.


I then peeled and sliced the sweet potato, into slices of about the same size as the artichoke slices. I placed the artichokes into my steamer and laid the sweet potato slices on top and steamed them for 15 minutes. Once they were steamed, the fun began!

The next and most important ingredient that needed chopping finely, was the fresh mint- and plenty of it! This was a single, meal-sized serving of 3 baby artichokes and a half of a medium-sized sweet potato. To this quantity I added a whole handful of mint. I also added a little chopped parsley, a little garlic a a little grated ginger. I carefully sautéed the potatoes and artichokes with all of the other ingredients in a little olive oil and seasoned with salt, plenty of pepper, a hint of nutmeg and a good squeeze of lemon juice. Be carefully, so at to just get everything nicely coated, but not to break up the sweet potatoes.

Next, I prepared a mix of breadcrumbs, grated salted ricotta cheese and a hint of olive oil. This would go to make the topping, which I added after arranging the sweet potato and artichokes in my little oven dish. I added a little thinly-sliced Spring onion and sprinkled the breadcrumb mix into the gaps in-between the artichokes and potatoes. And then into a hot oven it went for 5 minutes to warm through and 1-2 minutes under the broiler to get everything toasty and brown... mmm! The smell of the garlic, olive oil and mint is so wonderful! Be sure not to burn your lips because you won't be able to resist and will want to try it straight away ;-) !

Buon apetito!


Monday 23 April 2012

Rolling On...

Risotto di Pomodorini & Asparagi Selvaggi, con Involtini di Manzo e Ricotta Salata
Tomato & Wild Asparagus Risotto with Involtini & Salted Ricotta


So if you have been paying attention, in the previous few posts of mine, you will have noticed that I bought some lovely wild asparagus on Saturday- and that I also had a wonderful light evening meal of salad on beef carpaccio as well. Then there was the angels hair spaghetti with asparagus. And the frittata. Hey! What am I to do? I live alone and it takes a while to work your way through a bundle of asparagus on your own!


Well, this Monday evening, I had a slice of carpaccio left, as well as the last of the asparagus- and I did want to make use of it whilst it was still perky and fresh! One thing is for sure- "waste not; want not" is a turn of phrase that is very dear to my heart. And it would have been a sin to have let such wonderful produce go to waste!


So, this incredibly wonderful looking dish is essentially made from leftovers. Ain't that somethin'?

Fort the risotto, I began with the classic sofritto- finely diced carrot, celery and onion. I sautéed them in a little olive oil and as soon as the onion became translucent, added the arborio rice and a little crushed garlic. Once this was nicely coated in oil, I added a couple of tablespoons of tomato past and continued frying. I then added a good pinch of oregano and a bay leaf or two. After a minute or so, I deglazed the saucepan with a good splash of white wine and some hot vegetable broth.

And then the stirring began! You know the score- add a ladleful of broth and stir until it becomes absorbed, repeat over and over until the rice becomes soft and creamy. Only this time, after 10 minutes of cooking, I added the finely chopped stalks of the asparagus- I saved the more tender end pieces to fill the involtini, but we will get to that in just a minute...


After a further 5 minutes of stirring and adding broth as I went along, I added a good handful of finely chopped herbs- basil and parsley and the sliced cocktail tomatoes. I saved adding both the herbs and the tomatoes until a later point in time, shortly before completion, so as to not overcook them-  which would have meant losing the color and freshness of the herbs and the consistency of the tomatoes.

At this point, I blanched the asparagus briefly- just for 1 minute, in salted water, then drained then and rinsed them with cold water before wrapping them in the paper-thin carpaccio meat. I fried the rolls at a high heat in olive oil, with plenty of cracked black pepper, a little finely chopped garlic and a sprinkle of sea salt.

As soon as the risotto was ready, I served it up, with the little asparagus rolls on top and a light sprinkle of salted ricotta cheese... perfect! I just love making something out of nothing... especially when the something turns out like this!


Sunday 22 April 2012

Fried-Up Sunshine

Frittata con Asparagi Selvaggi e Pomodorini
Wild Asparagus and Cocktail Tomato Frittata


The word "frittata" just refers to something that has been fried in an egg batter... it could be anything- potato, broccoli, peppers, tomatoes... or as in this case- wonderful, seasonal, wild green asparagus and juicy cocktail tomatoes...

Sometimes we have to face facts and recognize that maybe we HAVE over-eaten a little in the past few days and that something a little smaller should be on the menu. But that doesn't mean it need not be satisfying a delicious!


I trimmed the tenderest parts off the asparagus and cut the remaining parts of the stalks that were still good into smaller pieces. Of course I took the woody end parts off and discarded those first of all!

I started to sautée the asparagus pieces in a little olive oil. I seasoned it with just a little finely chopped garlic, salt, pepper and nutmeg and after it had fried for 2-3 minutes, I added the pretty end pieces and sauteed those too- for just long enough that they took on a nice light coating of olive oil. I then put these on one side for later.

Next, I beat 2 eggs together with 2 tablespoons of ricotta and seasoned with salt and pepper. I added a good pinch of finely chopped parsley and grated it well with nutmeg.
I sliced the cherry tomatoes and a spring onion up, ready to go on top, as well as a little very finely sliced parmesan. Oh- and I turned on my oven and broiler ready to finish my little frittata off.


I poured 2/3rds of the egg mix over the asparagus pieces that were already in the pan and let it sit and fry for 2-3 minutes, until the base was firm and then began to arrange the asparagus, spring onion and tomatoes decoratively on top. I added the parmesan sparingly- I much prefer parmesan to become crispy and brown, rather then for it to be pale and slimy!


After a further 5 minutes at 350°, the frittata was firm, golden brown and ready to be served! And that is about the most perfect meal for this Springtime evening!


Accidental Oriental

Insalata di Couscous con i Cumquat, Crespino, Menta e Crescione
Couscous Salad with Cumquats, Barberries, Mint and Cress


And again- couscous! And what is not to love about this wonderfully versatile, light, quick and easy food?! I love the way that it take no real cooking- just some boiling water or stock poured over it is enough... Don't you wish that more of the good things in life were that simple? And this IS one of the good things!


Whilst rummaging through my spices, I stumbled upon an old favorite of mine- Sumac! This tangy-sour spice had been neglected for far to long I felt! A powder made of the outer casing, a bright red membrane that covers nutmeg, it is omnipresent in oriental cuisine- and a wonderful way to season a salad without reaching for a vinegar, which is what we are used to doing... fun!


To prepare the couscous, I sliced a few cumquats in slices and removed the stones, sliced up a few chives very finely, omitted the garlic that I would have used on account of me having a dental appointment in the morning, added a handful of barberries and a tablespoon of Ras al Hanout powder. I added the couscous, a little salt and pepper, plenty of finely chopped mint and parsley and then poured boiling water over it until it was just covered. 5 minutes later I gave it a stir. 10 minutes later it was done and ready to be fluffed up with a fork and filled with flavors from those good ingredients- what could possibly be easier?

I served my couscous on a bed of thinly sliced cucumber, to add a little juicy freshness and topped it with some crispy and peppery watercress. I added a little plain yogurt and a drizzle of sesame oil and a sprinkle of sumac to give it all a little bit of a kick! Quick, easy and full of Summer sunshine... what more could you want? Other than for the Summer to finally begin!


Nutty as a Cheese cake!

Piccola Torta di Ricotta, Mandorla e Frutti di Bosco
Individual Berry, Almond and Cream Cheese Pie


It was time for a little Sunday treat again- usually the only day of the week that I make anything sweet! Again, being the born NON-baker, I improvised, trusted on instinct, stubbornly attempted the impossible... and got away with it!

This is basically a cheese cake of sorts, with ground almonds added to make it firmer and more satisfying and mixed berries to make it fruitier and simply delicious. And does that sound like such a bad thing to you? I didn't think so! So fellow gastronauts- read on and enjoy!


The one thing that needs to be done here, is the simple short crust pastry base. I followed a simple rule I had picked up at some point, of it being a simple ratio of 1-2-3, whatever quantity you decide to make- meaning one part sugar, to 2 parts butter, to 3 parts flour.... so that is what I did! I stirred the ingredients into a dough and kneaded it until it was nice and smooth, then left it to rest for a while.

Next, I made up my filling. At this point I got a little creative and thought of my own ratio of 3 tablespoons of cream cheese, to 2 of vanilla custard powder, to one whole egg. This was perfect for 1 hearty serving. I whisked these together until smooth and added a cupful of frozen mixed berries. And yes of course- fresh would have been nice... but seriously- you are going to buy 4 lots of berries just to make one little individual cake? I didn't either. The frozen just makes more sense for this- plus they are going to be baked anyway! So in they go! I sweetened with stevia- about a tablespoonful was plenty for my taste and added a little cinnamon and a tiny squeeze of lemon juice. And not to forget- that little pinch of salt! Whisk together until everything turns a lovely mulberry color and then add 2-3 tablespoons of ground almonds. Mix them in well, feel free to lick that spoon and see how delicious it is... and go get busy with that pastry! It's time to bake!

Line your tray, dish or whatever form you are going to use with grease-proof paper. Roll out your dough into the appropriate shape and press it into place. Should you have any breaks in the dough, simply patch it up, press a little extra dough over the spot and hey presto! It will all melt and meld together anyway before it begins baking! Short crust pastry is very forgiving!

Add the filling right to the top- this is not some kind of cake that is going to rise-up on you and spill over the edge. And then say goodbye to at as you push it into a pre-heated oven at 400° for 45 to 60 minutes, depending on the size of your pie. I allowed mine a further 15 minutes with the oven turned off, just to be sure that the filling became nice and firm, but moist from the berries... and absolutely delicious! I actually ate mine warm... it just smelt so good! And I wouldn't blame you if you did the same!


Saturday 21 April 2012

Angels and Devils

Capelli Degli Angelli con Zafferano, Limone & Asparagi Selvaggi
Angels Hair Spaghetti with Saffron, Lemon and Wild Asparagus


At the moment, you can't see the forest for the asparagus over here in Germany! It is everywhere! Mostly, of course, it is the white asparagus that the Germans love and there are stalls selling it on every street-corner, or so it seems! For some reason, people here tend to prefer it to the green... but maybe, with this beautiful WILD green asparagus, I can manage to change a few of their minds...

I saw this at the market hall today and just had to have it! So fine and tender! I have it on good authority (howdy Stephen ;-) ), that this type of asparagus is easy to come by... in which case I envy you! It is quite the rarity here and was a little bit pricey- but was well worth it for its intense and rich flavor! Just delicious!


To make this unbelievably quick dish, you will need to prepare your saffron to flavor the pasta in advance. It does take at least 10 minutes for the saffron to infuse into liquid... and these amazingly thin "Angels Hair" spaghetti only take 2 minutes to cook!

I soaked my saffron, a good pinch of it, in a cupful of boiling vegetable stock for 10 minutes. Add a couple of slices of ginger and a little crushed garlic and set it to one side whilst you take care of the asparagus...

Trim away the tough ends of the asparagus, rinse and transfer to a frying pan, straight from the tap, so that they are still wet. Turn the heat up high and let them get nice and hot, tossing them about until the water is almost completely evaporated. Add some very finely chopped garlic, some coarsely ground black pepper, salt, a tiny pinch of sugar, a squeeze of lemon and a splash of olive oil. You will find that the water and oil combine with the other seasonings to give the asparagus a wonderful tasty glaze! 


Now for that pasta! Drop it into some boiling salted water and stir- it will become soft very quickly indeed! The package states 2 minutes of cooking time, so I cooked mine for just a minute or so, then drained it and returned it to the saucepan with the saffron infused stock and a good squeeze of lemon. I added a pat of butter and stirred constantly. Soon enough, the angels hair are soft, golden yellow and deliciously coated in delicious saffron and butter, with the added flavor of the stock, to make them into a real treat!

Serve with the asparagus on top and a nice sprinkle of chili flakes or if you have them, some smoked paprika flakes, like I did. You can hardly get either more simple or delicious than that now, can you? So all there is left to say now is buon apetito and enjoy!


Raw Deal - Great Meal!

Carpaccio di Vitello con Lattuga "Mache", Cumquat Trittate, Asparagi Verdi e Parmigiano
Carpaccio with Mache, Diced Cumquats, Asparagus and Parmesan


I get a lot of people telling me they don't know how to cook... which is fine- I don't know how to fly a plane.  We don't all have to be able to do everything! But you need to eat and I need to be able to fly to the USA! So here is a dish that needs no cooking- meaning you have now got no excuses...

Fresh and light and delicious- this great carpaccio recipe doesn't  take but a few minutes to make and yet I am sure if you serve this up to your friends or family, you will have something to talk about for quite a while...


The asparagus was incredibly tender, as you can see in the photographs- so I decided to serve that up raw as well as the beef. With a carpaccio, it is all about the combination of the flavors and the dressing you use. And maybe a little trick or two. So in this case, we simply lay out the beef first and then set our mache decoratively on top of it.

Next, finely chop a couple of cumquats, add a little bit of grated garlic and grated ginger, some salt, pepper and a little honey. Stir well and allow 10-15 minutes at least for the flavors to combine and infuse nicely.

Sprinkle the finely chopped cumquat on top, then add a few stalks of asparagus and the slices of parmesan, some salt, pepper and a little olive oil... easy! A tiny trickle of honey and a few drops of orange juice are the finishing touches and you are ready to serve... and just to think- you didn't have to cook a single thing!